How to Use a Limiter: Concepts, Then This Studio’s Controls
Limiter use starts with three ideas — input level, ceiling and release — then maps to the controls you actually have.
Upload your track
Drop your finished mix here to get started.
Upload only audio you own or have permission to process. See Terms and Privacy.
On this site that means profiles and Intensity, not a full limiter panel.
A limiter is a high-ratio compressor that holds peaks at a ceiling so the signal does not smash past a set level. Apple’s Digital Masters guide calls limiting a fast-acting form of compression often used to attenuate peaks that could cause distortion. Classic controls include input/gain, ceiling (or output) and release. This studio does not expose separate ceiling or release knobs. You choose a sound profile and move Intensity (0–100, step 10) plus a three-band EQ. The engine’s built-in limiting uses fixed internal behaviour on the base render.
For pricing and downloads, open the mastering tool.
Before you begin
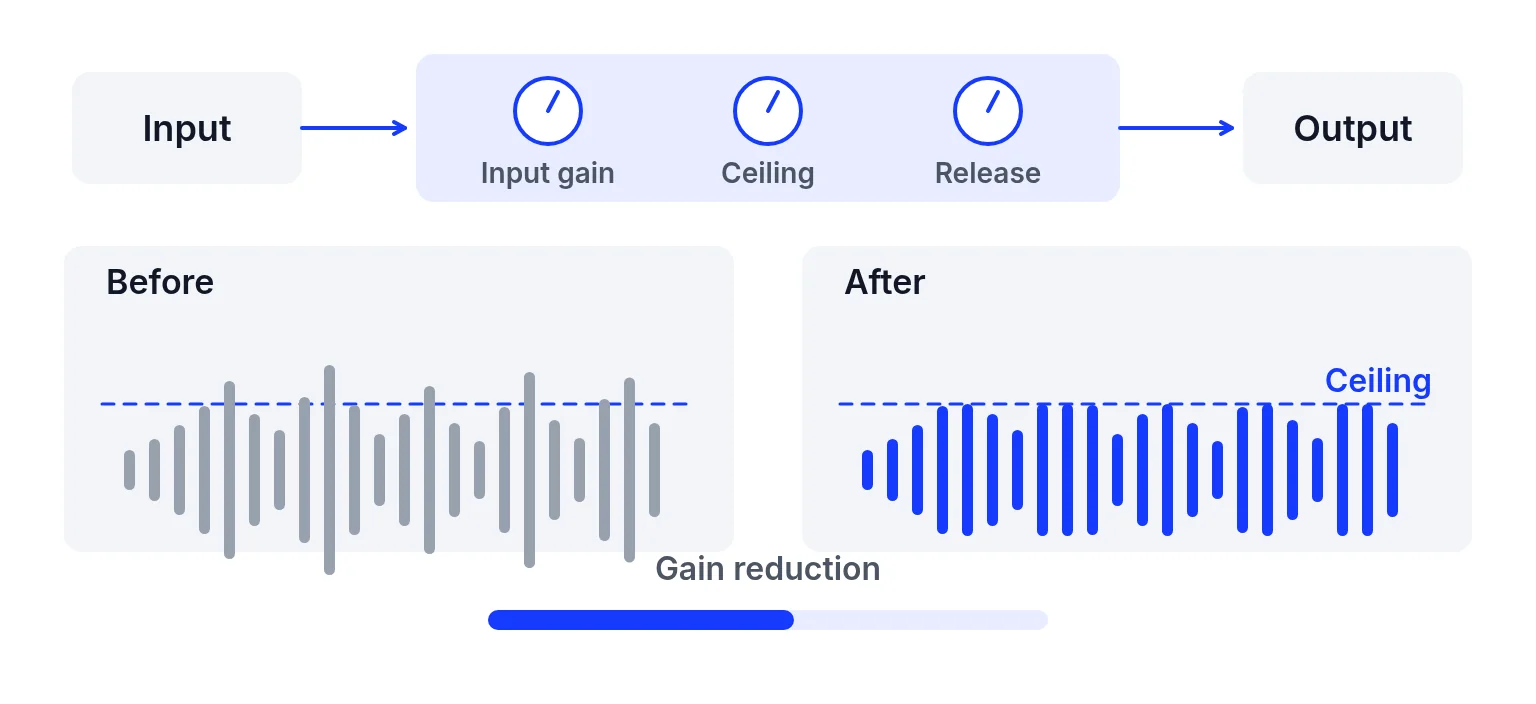
- Ceiling — the level peaks should not exceed.
- Release — how quickly the limiter stops reducing gain after a peak.
- Gain reduction — how much the limiter is turning peaks down.
Pushing input into a low ceiling raises loudness but can cause pumping, dullness or distortion — especially once true peaks and lossy encoding enter the picture. See true peak limiter for inter-sample peaks.
Whether you work in a DAW or here, leave headroom into the limiting stage. If the mix already hits full scale on every snare, the limiter can only squash. Pull bus peaks down first, then limit. In this studio that means starting from a sensible bounce and using moderate Intensity before you ever unlock a download. Compare Original and Mastered at similar perceived levels in a player that can match loudness if you need a fair A/B — the studio itself does not offer a visible loudness-match control.
Stop raising Intensity when vocals get smaller, cymbals get crunchy, or the groove pumps. Limiting will not separate a quiet lead from a loud pad; that belongs in mixing. It will not remove generation artifacts that need a new export. And it will not guarantee louder playback on normalized streaming services. Use the loudness normalization guide to understand playback gain, then keep creative dynamics where they matter.
How to use a limiter in this studio
Prepare a mix with some peak headroom
Finish balance first. A file already glued to 0 dBFS leaves the limiter little honest work.
Audition Intensity, not imaginary knobs
Upload, pick a profile, move Intensity in steps of 10, and listen for pumping. Use EQ lightly after.

Check the report, then export if unlocked
Read estimated true peak and LUFS. Unlock song credits for downloads. Verify critical deliveries in a dedicated meter.
Common problems and what to check
Common mistakes when people learn limiting for masters:
- Driving input until the meter is pinned, then calling it “loudness.”
- Ignoring release-time pumping on kick and vocal.
- Limiting a clipped file and expecting the distortion to disappear.
- Matching streaming blog numbers that a platform never published.
On this site, avoid those traps by moving Intensity in small steps, listening to quiet and loud sections, and reading estimated true peak after the base render.
Classic limiter articles talk about gain into a ceiling. Here, raising Intensity is the closest everyday move. It is not identical to a precision ceiling control, and you should not write delivery notes that claim a user-set ceiling from this UI. If you need that precision, use a dedicated limiter meter offline after you download.
| Problem | Likely cause | What to check |
|---|---|---|
| The meter is pinned and called loudness | Input was driven until the limiter could only squash. | Leave headroom into the limiting stage. Move Intensity in steps of 10. |
| Kick and vocal pump | Release is recovering too obviously. This studio has no separate release knob. | Stop raising Intensity when the groove pumps. |
| Clipping that will not go away | Limiting a clipped file rarely removes the distortion. | Fix the source. Clipped source often stays audible. |
| A buried vocal | Limiting will not separate a quiet lead from a loud pad. | That belongs in mixing. |
| A streaming number the platform never published | Blog targets are not the same as a help page. | Read loudness normalization for what playback gain actually does. |
| Delivery notes that name a ceiling from this UI | There is no ceiling control to set. | Write the notes from a dedicated meter after you download, if you need that precision. |
- No separate limiter ceiling/release UI.
- Estimated true peak only.
- Preview free; downloads need song credits ($1.99 / 5).
- Limiting will not fix a buried vocal — that is mixing.
Check the finished file
1. Start with a finished mix that is not already smashed into full scale.
2. Pick a profile (Universal is a safe audition).
3. Set Intensity near the default, listen, then move in steps of 10.
4. Read estimated true peak and LUFS on the base render.
5. Unlock song credits only when you want a WAV/MP3.
Do not claim you set a ceiling inside this UI — that control is not shown.
1. Bounce a mix with a few dB of peak headroom.
2. Upload and set Intensity to the default.
3. A/B Original vs Mastered while watching the report.
4. Nudge Intensity ±10 and stop when punch turns to squash.
5. Unlock a download only when the sound is settled.
That routine is a limiter-minded workflow inside a preset studio: concepts first, then the controls that actually exist.
The screenshot of Intensity at 90% is a real Intensity setting on a synthetic test session. It is not a recommended setting for your song. Read estimated true peak on the report, or on the LUFS meter page, before you share the file.
Ready to check your mix?
Upload above, preview free, and unlock song credits only when you need a download. → AI music mastering
How to use a limiter FAQ
How do I use a limiter on this site?
Choose a profile and adjust Intensity and EQ. There are no separate ceiling or release controls in the studio UI.
What is a limiter ceiling?
The level peaks should not exceed. It is a concept; this UI does not expose a ceiling knob.
What is limiter release?
How fast gain reduction recovers after a peak. Not a separate control here.
Why is Intensity at 90% in the screenshot?
It shows a real Intensity setting on a synthetic test session — not a recommended setting for your song.
Will a limiter make my song louder on Spotify?
Not reliably. Spotify turns loud masters down toward its published playback level. See loudness normalization.
Is previewing free?
Yes. Downloads need song credits.
Can limiting repair clipping?
Usually no. Clipped source often stays audible.
Should I limit before or after EQ?
In this studio EQ is part of the live controls around the preset chain; audition both and trust your ears plus the report.
Where can I read true peak?
In the processing report’s Estimated true peak row, or on the LUFS meter page.
Related links
- Inter-sample peaks: why sample peak is not the whole story.
- Playback gain on streaming services: a limiter does not guarantee a louder stream.
- Where the report’s true-peak row is explained: read the number on your own file.
- Preview it on a finished mix: upload, listen, and unlock song credits only when you need a download.
Platform names are trademarks of their owners. This site is not affiliated with or endorsed by them. Statements checked 2026-11-09 may change.
Last updated: 2026-11-10